
You've seen the AI storyboards floating around Twitter. Scene 1: a dark-haired woman in a trenchcoat. Scene 3: the same character is now blonde, wearing a hoodie, and appears to be a different person entirely.
This happens because most AI image generation workflows treat each shot as an isolated prompt. There's no memory between images. No shared definition of what "the protagonist" actually looks like. Every prompt starts from zero.
We built a system that fixes this. It's a Claude Code skill — a structured 10-phase pipeline that decomposes scripts into scenes and shots, extracts every visual element (characters, objects, locations), generates reference images for each one, locks them down with human approval, and then feeds those reference images into every scene prompt so the AI can see exactly what each character and location should look like.
The result: storyboards where characters look like themselves across 16+ shots, locations maintain their atmosphere, and objects keep their distinctive features from scene to scene.
Here's how it works.
Why most AI storyboards fail
The core problem is deceptively simple. When you prompt an image generation model with "a woman in a workshop picks up a key," the model invents everything — her age, hair color, the workshop's layout, the key's design. Prompt it again for the next shot and it invents everything again, differently.
Two failure modes kill consistency:
No shared element definitions. Without a canonical description of each character, object, and location, every shot becomes a fresh interpretation. Your protagonist drifts across shots like a shapeshifter.
The paraphrase trap. Even if you try to repeat descriptions, you'll naturally rephrase things between shots. "Silver-white hair" becomes "grey hair" becomes "light-colored hair." Each paraphrase gives the model permission to drift further from the original.
The fix isn't better prompting. It's better architecture.
The element system: define once, lock the image, reference everywhere
The element system treats characters, objects, and locations as first-class entities — like database records. Each gets:
- A canonical name — the identifier used everywhere
- A compact descriptor — 15-50 words of pure visual detail, no narrative
- Visual anchors — 2-3 distinctive features that make the character recognizable
- A locked reference image — generated, reviewed, and approved before any scene work begins
Here's what an element definition looks like in practice:
ELARA VOSS — CLOCKMAKER
Lean woman in her 60s with silver-white hair pulled into a loose
bun. Deep-set dark eyes behind half-moon brass spectacles. Wears a
worn leather apron over a high-collared charcoal linen shirt.
Calloused hands with long, precise fingers.

Visual anchors: brass spectacles, silver-white hair bun, leather apron
Reference image: images/elements/elara-voss.png (LOCKED)
This is how a human storyboard artist works. Before drawing a single scene, they create character sheets — front-facing views, 3/4 angles, expression studies. Those sheets become the reference for every panel in the storyboard. Our system does the same thing, but with AI image generation.
The reference image for each element gets fed directly into every scene prompt that includes that element. The image generation model doesn't just read a text description — it sees the actual approved image of the character and uses it to maintain consistency across shots. Text descriptors alone drift. Images anchor.
This is the key insight: consistency comes from visual reference, not text repetition. You generate the element images first, get human approval, lock them, and then every scene prompt includes those locked images as input. The AI sees what Elara looks like in shot 1 because it's looking at the same approved reference image it used in shot 16.
Element types
The system handles three types:
- Characters: Age, build, hair, eyes, skin tone, wardrobe, distinguishing features, posture
- Objects: Material, color, size, condition, distinctive markings (a key isn't just "a key" — it's "a tarnished brass skeleton key with an intricate clock-gear bow, darkened with age")
- Locations: Architecture style, lighting quality, color palette, atmosphere, key fixtures
Enrichment: inventing what the script doesn't say
Scripts are sparse by nature. "INT. WORKSHOP — NIGHT" tells you almost nothing about what the workshop looks like. The element extraction phase requires you to invent these details:
- What material are the walls? Stone? Wood? Plaster?
- What's the primary light source? An oil lamp? Moonlight through a window?
- What's the color palette? Warm ambers and brass? Cool blues and steel?
- What objects fill the space? Clocks, obviously — but are they mounted on shelves? Hanging from the ceiling?
The enrichment step is where generic storyboards become cinematic ones. You're not just transcribing the script — you're building a visual world.
The 10-phase workflow
The full pipeline runs in 10 phases. Each phase builds on the previous one, and most include approval checkpoints where the human reviews and adjusts before moving forward.
Phase 1: Script development
Start with a script or idea. Could be a polished screenplay or a napkin sketch. The goal is to get scene locations and key action beats defined clearly enough to decompose.
Phase 2: Element extraction
Parse the script and extract every character, object, and location. For each one, write a compact visual descriptor with anchors. This happens before any scene generation. You can't generate consistent shots if you haven't locked down what things look like.
Checkpoint: The human reviews all element descriptions. "Does this character look right? Should the workshop feel more cluttered?"
Phase 3: Element reference images (the critical step)
Generate reference images for each element — character sheets, location establishing shots, object close-ups. Use whichever model best suits the art style (Gemini, FLUX, Midjourney — whatever produces the look you want). These reference images become the visual bible for the entire project. Once the human approves them, they're locked and used as image inputs for every scene prompt going forward.
This is the step most people skip, and it's the step that makes everything else work. Without locked reference images, you're asking the scene generation model to invent the character's appearance from scratch every time.
Checkpoint: Human approves character designs and location aesthetics. This is the most important gate in the entire pipeline.
Phase 4: Scene decomposition and shot breakdown
Break the script into scenes by location/time changes, then break each scene into 3-7 shots. Each shot gets a camera type (wide, medium, close-up, POV) and a rich visual description.
Before composing shots, extract the 5-10 most visually critical narrative beats and ensure each appears in at least one shot. This prevents the most common decomposition failure: dropping important story moments.
Checkpoint: Human reviews the shot-by-shot breakdown.
Phase 5: Prompt composition
For each shot, compose a self-contained image generation prompt by combining the shot description with the relevant element descriptors. The prompt also references the locked element images — the model receives both the text description and the actual reference images for every character, object, and location in the shot. The result is an 80-150 word paragraph optimized for image models — pure visual description, no dialogue, no narrative context.
Phase 6: HTML storyboard
Generate an interactive HTML storyboard that the human can view in any browser. Scene headers, shot cards with descriptions, element badges, camera type indicators.
Phase 7: Shot image generation
Generate scene images using the composed prompts plus the locked element reference images as input. We use Nano Banana Pro (Google's image generation model via Gemini) for scene generation — it handles reference image inputs natively and produces cinematic, consistent results. The recently released Nano Banana 2 pushes quality even further with better composition and lighting. Review in batches — flag consistency issues, regenerate as needed.
Phase 8: Video prompt composition
Turn approved storyboard images into video clips using structured video prompts (action, camera movement, duration, atmosphere).
Phase 9: Assembly
Stitch clips in Remotion, add audio (VO, music, SFX), final export.
Phase 10: Post-mortem
Capture what worked and what failed. Which prompt patterns produced good results? Where did consistency break? These learnings compound across projects.
Prompt engineering that actually works
Shot prompts aren't freeform text. Each one is composed from structured fields, plus the locked reference images for every element in the shot:
| Field | Purpose | Example |
|---|---|---|
| Reference images | Locked element images fed as input | elara-voss.png, workshop.png, brass-key.png |
| Subject | Who/what, using compact descriptors | "A lean woman in her 60s with silver-white hair..." |
| Action | What's happening physically | "slides open a hidden drawer" |
| Environment | Location descriptor | "narrow workshop lined with antique clocks" |
| Lighting | Direction, quality, color temp | "single amber oil lamp, warm directional" |
| Camera | Framing + angle | "extreme close-up, shallow depth of field" |
| Palette | 2-4 dominant colors | "amber, dark walnut, tarnished brass" |
| Mood | Atmospheric feel | "intimate, consequential" |
| Style | Rendering approach | "cinematic photorealistic, film grain" |
The text fields get composed into a single paragraph. But the real consistency comes from the reference images — the model sees the approved character image and matches it, while the text directs the action, lighting, and composition.
Before and after
Bad approach (text-only, no reference images):
Elara picks up the key in her workshop
The model invents Elara's appearance from scratch. She'll look different in every shot.
Good approach (reference images + structured prompt):
[Input images: elara-voss.png, brass-key.png, workshop.png]
Extreme close-up, shallow depth of field. The clockmaker gently lifts a tarnished brass skeleton key with an intricate clock-gear bow from a velvet-lined drawer. The narrow workshop behind her is softly lit by a single amber oil lamp, casting warm directional light across rows of antique clocks. Palette: amber, dark walnut, tarnished brass. Mood: intimate, consequential. Cinematic photorealistic with subtle film grain.
The model sees exactly what Elara looks like, what the key looks like, and what the workshop looks like. It just has to compose them into the described scene. That's a fundamentally easier task than inventing everything from text alone.
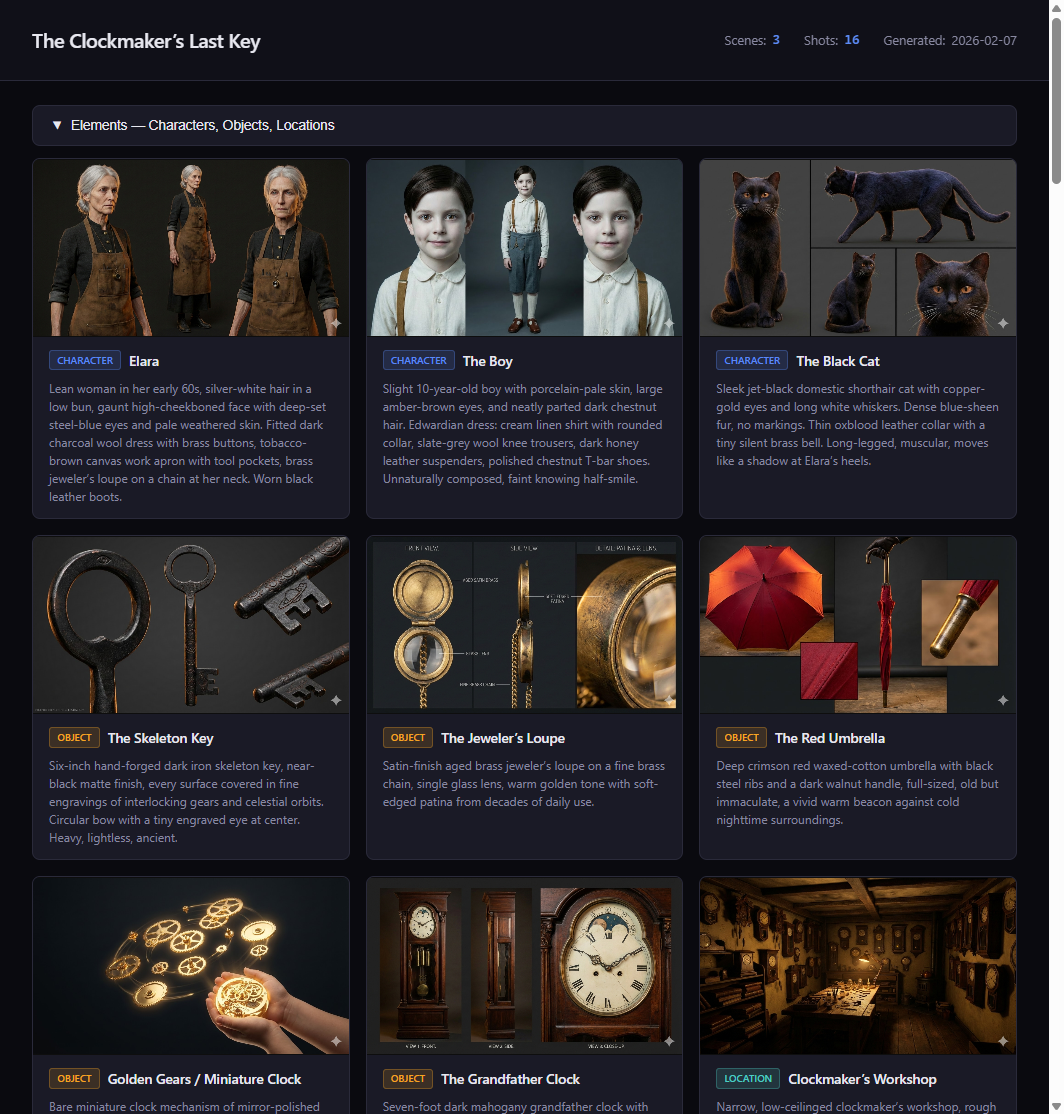
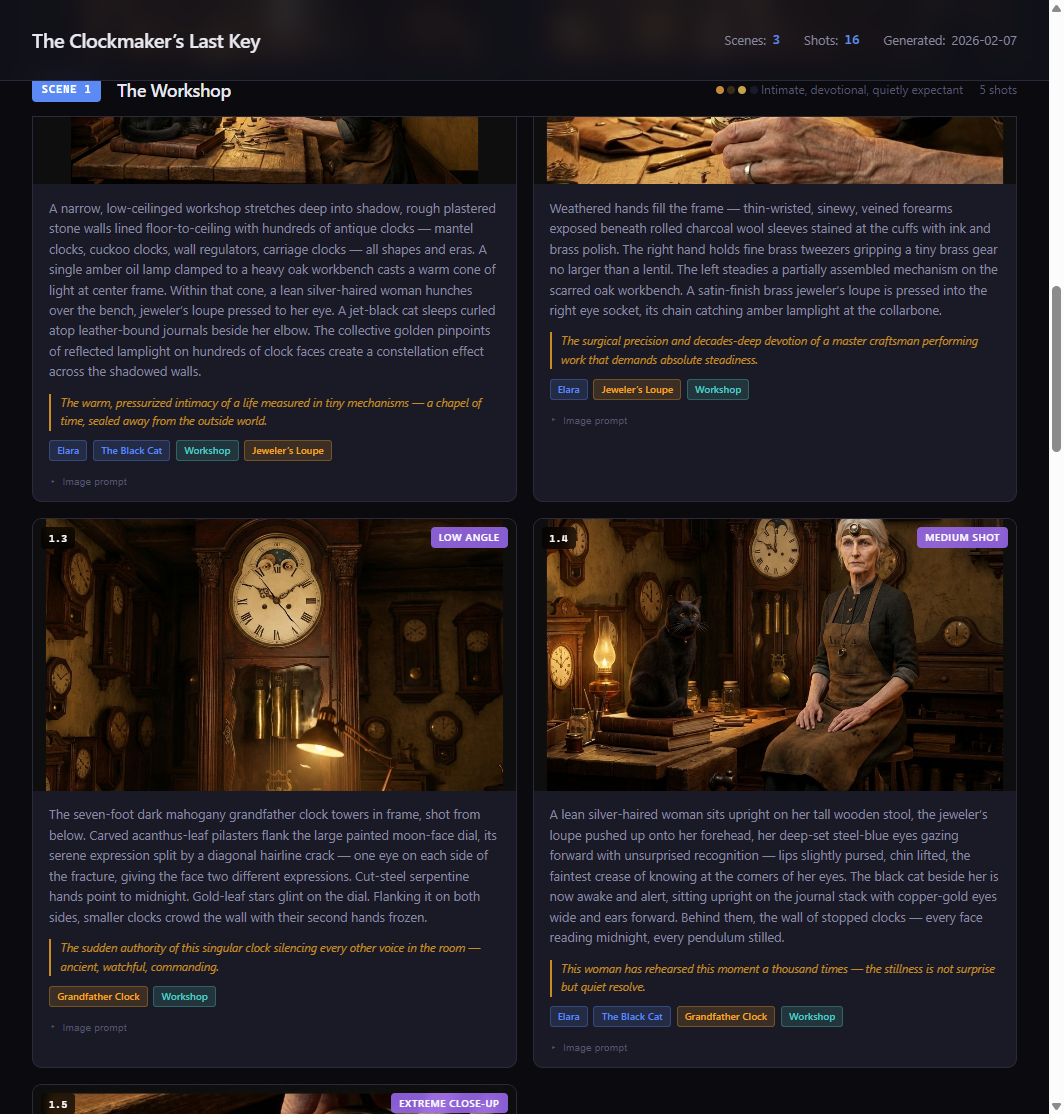
Real results: The Clockmaker's Last Key
We tested this system on a short film storyboard called "The Clockmaker's Last Key" — a story about an elderly clockmaker who discovers a mysterious key hidden inside a clock. 3 scenes, 16 shots, 11 visual elements.
Because every scene prompt included the locked reference images for Elara, the workshop, and the key, the model maintained consistency across all 16 shots. Elara's brass spectacles, silver-white hair bun, and leather apron appear in every frame she's in — not because we repeated text descriptions, but because the model was looking at her approved reference image every time. The workshop maintained its warm amber palette and cluttered-but-organized feel. The key kept its distinctive clock-gear bow design throughout.

Five rules that can't be broken
After multiple projects, five architectural truths emerged:
-
Hierarchical decomposition works. Script → Scenes → Shots. Don't skip levels. Jumping from script to shot prompts drops narrative beats.
-
The element system is the backbone. Characters, objects, and locations as first-class entities with locked reference images that get fed into every scene prompt. Text descriptions support the images, but the images do the heavy lifting for consistency. This is the single most important design decision.
-
Shot descriptions are image prompts. 50-100 words of self-contained visual description. Not stage directions. Not screenplay formatting. Pure visual instruction.
-
Enrichment is mandatory. You must invent visual details the script doesn't specify. Wardrobe, eye color, material textures, lighting quality. This is where bad storyboards become good ones.
-
Key moment injection prevents beat-dropping. Extract critical narrative beats first, then verify each one appears in the shot breakdown. Without this step, important story moments get lost in decomposition.
Free Download
Get the Storyboard Video Creator Skill
The full 10-phase pipeline as a Claude Code skill. Includes prompt templates, best practices, element extraction chains, and the HTML storyboard viewer.
SKILL.md (master workflow) · Prompt templates for decomposition, element extraction, prompt composition · Best practices for enrichment, visual consistency, prompt engineering · HTML storyboard viewer template · Knowledge base with model-specific insights
Getting started
To use the skill, you need Claude Code installed. Drop the skill files into ~/.claude/skills/storyboard-video-creator/ and Claude will auto-discover it based on trigger phrases in the SKILL.md description.
Start with a script — even a rough one. The pipeline will walk you through element extraction, approval checkpoints, and shot generation. Each phase builds on the last, and you approve at every gate before moving forward.
The workflow is collaborative, not automated. The AI handles decomposition, enrichment, and prompt composition. You handle creative direction — is this character right? Does this location feel right? Should this shot be a close-up instead of a wide?
That's the split that works. AI for consistency and structure. Humans for taste and story.
Frequently asked questions
What AI image generation models work with this workflow?
The workflow uses two stages with potentially different models. For element reference images (character sheets, location refs), you can use whichever model best suits your art style — Gemini, FLUX, Midjourney, whatever produces the look you want. For scene generation, we use Nano Banana Pro (Google's Gemini image model) because it handles reference image inputs natively — you feed it the locked element images and it uses them to maintain consistency. The recently released Nano Banana 2 improves on this further with better composition and lighting fidelity.
How long does a full storyboard take to produce?
A 3-scene, 15-shot storyboard typically takes 2-4 hours including all approval checkpoints. Most of that time is in the element extraction and enrichment phase (getting characters right) and image generation (reviewing and regenerating shots). The decomposition and prompt composition steps are fast — usually under 30 minutes for the whole script.
Can I use this for animation or just photorealistic styles?
Both. The element system and prompt structure work for any visual style — photorealistic, anime, watercolor, pixel art, 3D render. You control the style through the style field in each prompt. The consistency benefits are actually more dramatic in stylized approaches where character drift is harder to notice and correct.
What's the difference between this and using image-to-image on a single reference?
Basic img2img uses one source image to guide generation, which helps with style but locks you into similar compositions. The element system is different — you generate dedicated reference images for each element (characters, locations, objects), lock them with human approval, and then feed the relevant references into each scene prompt. A close-up of Elara picking up a key receives three reference images: Elara's character sheet, the key close-up, and the workshop establishing shot. The model composes a new scene from those references rather than trying to transform a single source image.
Do I need a paid Claude subscription to use this?
You need Claude Code, which requires a Claude Pro or Max subscription. The skill itself is free — it's a collection of markdown files and prompt templates that Claude Code reads as instructions. Image generation costs depend on which service you use (some are free tier, some are paid).


